Mapping Values in Arduino: A Comprehensive Guide to the map() Function
Related Articles: Mapping Values in Arduino: A Comprehensive Guide to the map() Function
Introduction
With enthusiasm, let’s navigate through the intriguing topic related to Mapping Values in Arduino: A Comprehensive Guide to the map() Function. Let’s weave interesting information and offer fresh perspectives to the readers.
Table of Content
- 1 Related Articles: Mapping Values in Arduino: A Comprehensive Guide to the map() Function
- 2 Introduction
- 3 Mapping Values in Arduino: A Comprehensive Guide to the map() Function
- 3.1 Understanding the Essence of map()
- 3.2 Applications of map() in Arduino Programming
- 3.3 Benefits of Utilizing the map() Function
- 3.4 Frequently Asked Questions (FAQs)
- 3.5 Tips for Effective map() Utilization
- 3.6 Conclusion
- 4 Closure
Mapping Values in Arduino: A Comprehensive Guide to the map() Function

The Arduino platform offers a versatile set of functions for manipulating data and controlling hardware. Among these, the map() function stands out as a powerful tool for converting values from one range to another. This article delves into the intricacies of the map() function, providing a comprehensive understanding of its application and significance in Arduino programming.
Understanding the Essence of map()
At its core, the map() function acts as a value translator. It takes a value from a specific input range and converts it to a corresponding value within a designated output range. This process is akin to scaling or re-mapping a value to fit a different context.
The Syntax:
long map(long x, long in_min, long in_max, long out_min, long out_max)The function accepts five parameters:
- x: The input value to be mapped.
- in_min: The minimum value of the input range.
- in_max: The maximum value of the input range.
- out_min: The minimum value of the output range.
- out_max: The maximum value of the output range.
The Logic:
The map() function calculates the proportional relationship between the input value and the input range. It then applies this proportion to the output range, yielding the corresponding mapped output value.
Illustrative Example:
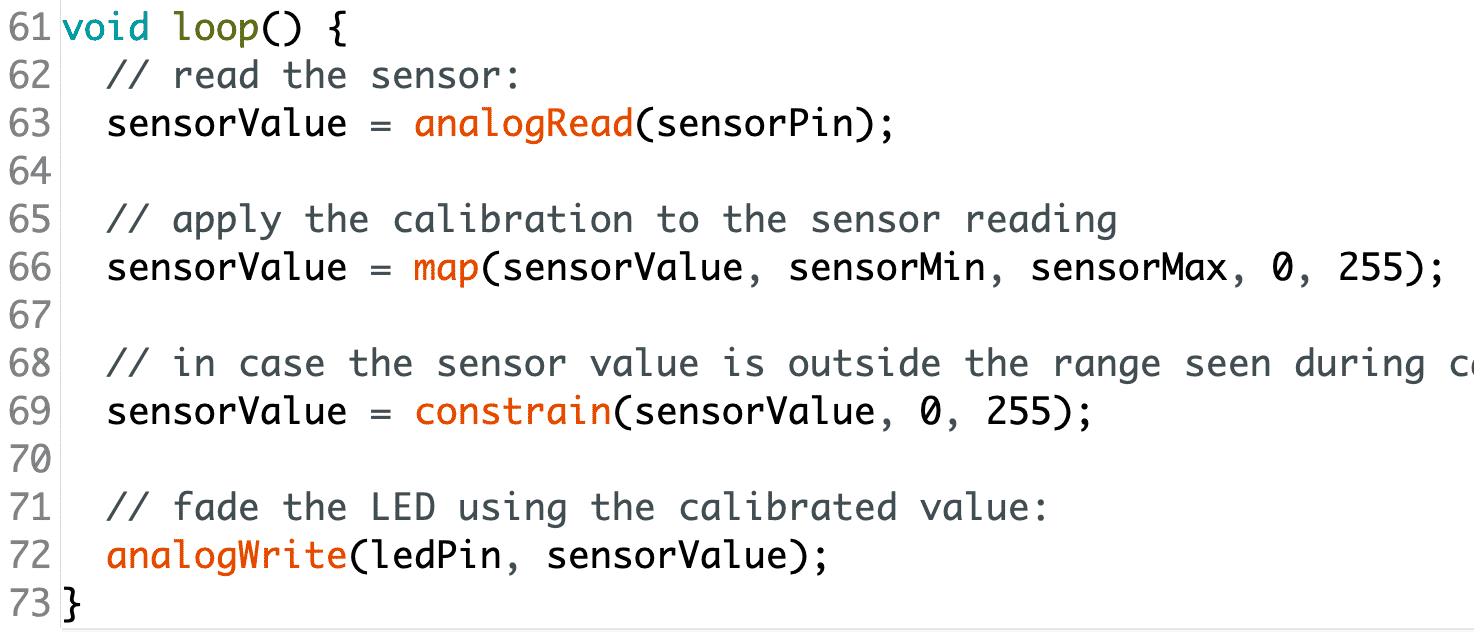
Imagine a sensor reading a temperature ranging from 0 to 100 degrees Celsius. However, your device’s display can only show values from 0 to 255. The map() function can seamlessly translate the sensor readings to the display’s range:
int sensorReading = 50; // Sensor reading of 50 degrees Celsius
int displayValue = map(sensorReading, 0, 100, 0, 255); // Maps to 127.5 on the display
In this example, the map() function takes the sensor reading of 50, scales it according to the input and output ranges, and produces a value of 127.5 for the display.
Applications of map() in Arduino Programming
The map() function proves invaluable in various Arduino programming scenarios, including:
-
Sensor Data Scaling: Sensors often provide raw data that needs to be scaled to a usable range for processing or display.
map()facilitates this conversion, ensuring accurate interpretation of sensor readings. - Analog Input Control: Analog inputs, such as potentiometers or joysticks, provide a variable voltage that can be mapped to control motors, LEDs, or other actuators.
-
PWM Output Adjustment: Pulse Width Modulation (PWM) is a common technique for controlling the brightness of LEDs or the speed of motors.
map()allows for precise adjustment of PWM values based on user input or sensor readings. -
Graphical User Interface (GUI) Mapping: When using graphical libraries like TFT displays,
map()enables the conversion of touch coordinates or joystick movements to corresponding positions on the screen. -
Data Visualization:
map()can be used to scale data for visualization on graphs, charts, or other visual representations.
Benefits of Utilizing the map() Function
Employing the map() function offers several advantages in Arduino programming:
-
Code Simplicity:
map()encapsulates the complex calculation of proportional relationships, simplifying code and improving readability. - Flexibility: It allows for easy customization of input and output ranges, adapting to diverse scenarios and hardware configurations.
- Efficiency: The function performs the mapping operation in a single line of code, optimizing execution time and reducing computational overhead.
-
Enhanced Accuracy: By accurately scaling values,
map()ensures precise control and data interpretation.
Frequently Asked Questions (FAQs)
1. What data types can be used with map()?
The map() function operates on long data types. This allows for a wide range of values, accommodating both integer and floating-point data.
2. Can map() handle negative values?
Yes, map() can handle both positive and negative values within the input and output ranges.
3. Is it possible to use map() with arrays?
While map() itself doesn’t directly operate on arrays, you can iterate through array elements and apply map() to each element individually to achieve the desired mapping.
4. What happens if the input value falls outside the input range?
If the input value is less than in_min or greater than in_max, the output value will be extrapolated beyond the output range. This can lead to unexpected results, so it’s crucial to ensure the input value stays within the specified range.
5. Are there alternatives to using map()?
While map() provides a convenient solution, you can achieve similar results using mathematical operations like multiplication, division, and addition. However, map() offers a more concise and readable approach.
Tips for Effective map() Utilization
- Define clear input and output ranges: Accurately specifying the input and output ranges is crucial for accurate mapping.
-
Consider data type limitations:
map()works withlongdata types, so be mindful of potential overflow issues when dealing with large values. -
Use comments for clarity: Add comments to explain the purpose and logic of each
map()function call, improving code readability and maintainability. - Test thoroughly: Verify the accuracy of the mapping by testing with various input values and comparing the output with expected results.
- Explore alternative mapping techniques: For more complex mapping requirements, consider using lookup tables or interpolation methods.
Conclusion
The map() function serves as a fundamental tool for data manipulation in Arduino programming. Its ability to seamlessly translate values between different ranges empowers developers to control hardware components, interpret sensor readings, and visualize data effectively. By understanding the principles and applications of map(), Arduino users can enhance the functionality and accuracy of their projects, unlocking a wider range of possibilities.


Closure
Thus, we hope this article has provided valuable insights into Mapping Values in Arduino: A Comprehensive Guide to the map() Function. We appreciate your attention to our article. See you in our next article!